
When I first learned about Swift MVVM architecture, it took me some time to understand the underlying logic. In this article, I will explain, as a beginner to a beginner, what is Swift MVVM as simply as possible.
What, Why and How of MVVM
Although MVVM is not new, the latest introduction of SwiftUI led to changes in the architecture as well. Since SwiftUI is declarative, as opposed to the UIKit, it needed to reflect those changes. MVVM stands for Model-View-ViewModel. Let’s see what does that means one by one.
Most of the MVVM articles were too advanced or assumed you have prior knowledge of Swift architectures. It was challenging to grasp the core idea behind it as I was new in mobile app development. In the following extremely simple example I will try to explain what are the components of the MVVM architecture and why would we need it.

As you can see in the diagram above, the architecture is composed of three parts: the Model, which represents our data, the View or the interface and the ViewModel that acts as a mediator between the View and the Model. The View can directly communicate with the Model in case it is a simple app, however, once there network requests or data operations, then we would definitely need a ViewModel. Let’s start with the Model.
Model
In a generic app, you will most likely have some data with a custom model to represent it. For instance, let’s say we have a Person with a few properties. That is our model that holds the data we need. Later, this model can be used to make a list of other instances stored somewhere on a server that is fetched when we need it. But for now, we will have manually set instances in an array.
struct Person { // Our model with the data as its properties

let name: String

let score: Int

}

let people = [ // Our array of instances of our model

Person(name: "Player 1", score: 10)

]
View
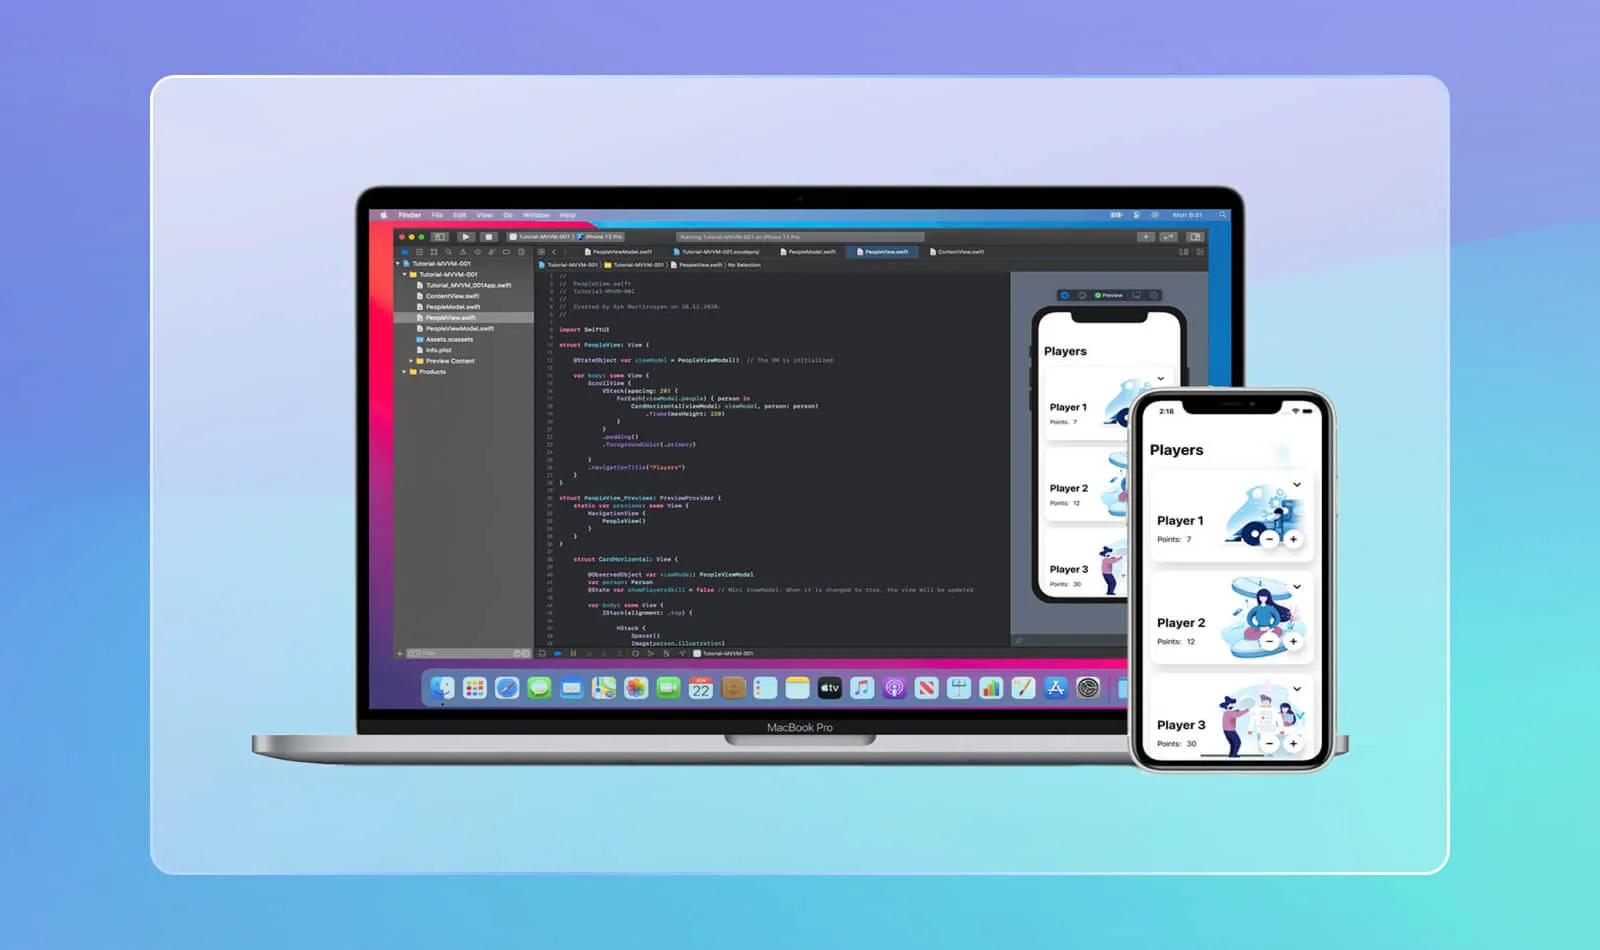
- View by far is the simples because SwiftUI makes it so. We have to just declare what we want to see on the screen and the rest will be taken care of by Swift. Let’s build a simple interface to represent our people array. Let’s say we have a simple scrollable view representing players that have a name, a number of points and a couple of buttons to increment and decrement their points.
struct PeopleView: View {

var body: some View {

ScrollView {

VStack(spacing: 20) {

ForEach(people, id: .self) { person in

CardHorizontal(person: person)

.frame(maxHeight: 220)

}

}

.padding()

.foregroundColor(.primary)

}

.navigationTitle("Players")

}

}
In this simple example you might want to implement the button functions directly in the view, however, the more complex the data and logic becomes, the more obvious would it be why we should separate logic from the view.
ViewModel
The main role of a ViewModel is the logic and operations between our View and our Model. In the simplest cases, the role of a ViewModel can be taken by @State and @Binding property wrappers in the view. It tells the View to update the UI whenever its value is changed.
// CardHorizontal.swift

struct CardHorizontal: View {

var person: Person

@State var showPlayersSkill = false // Mini ViewModel. When it is changed to true, the view will be updated

var body: some View {

ZStack(alignment: .top) {

HStack {

Spacer()

Image(person.illustration)

.resizable()

.aspectRatio(contentMode: .fit)

}

HStack {

Spacer()

VStack {

Button(action: {

withAnimation() {

showPlayersSkill.toggle() // Here we toggle the @State variable to true or false

}

}) {

RoundIconButton(icon: "chevron.down", hasShadow: false)

.rotationEffect(showPlayersSkill ? .degrees(-180) : .degrees(0)) // We can also use @State vars to conditionally apply effects

}

}

}

.padding()

HStack {

VStack(alignment: .leading, spacing: 5) {

Spacer()

HStack {

Text(person.name)

.font(.title)

.fontWeight(.bold)

}

.foregroundColor(.primary)

HStack {

Text("Points: ")

Text("(person.points)")

Spacer()

}

.foregroundColor(.primary)

if showPlayersSkill { // Once showPlayersSkill is true, this block of code will be shown

HStack {

Text(person.skill)

}

}

}

Spacer()

}

.padding()

.padding(.bottom)

}

.frame(maxWidth: .infinity)

.background(Color.white)

.overlay(

RoundedRectangle(cornerRadius: 20)

.stroke(Color.primary.opacity(0.3), lineWidth: 0.5)

)

.clipShape(RoundedRectangle(cornerRadius: 20))

.shadow(color: Color.black.opacity(0.15), radius: 15, x: 5, y: 15)

}

}
Now let’s implement a real ViewModel. Our VM will have two functions, incrementPoints() and decrementPoints(). We can write functions in our views but the idea is to separate View related code and the logic-related code. In theory, every View should have its own ViewModel. The way we implement VM is by creating a new file and a class. A ViewModel is a class that conforms to ObservableObject protocol. To publish changes, we should use the @Published wrapper to let the view know what’s been changed. Once we mutate our people list, the view will know and redraw accordingly.
// PeopleViewModel.swift

final class PeopleViewModel: ObservableObject { // to let our view observe changes done by our VM, we have to conform to ObservableObject protocol

@Published var people = [ // Our array of instances of our model

Person(name: "Player 1", points: 7, illustration: "Illustration-10", skill: "Amateur"),

Person(name: "Player 2", points: 12, illustration: "Illustration-9", skill: "Professional"),

Person(name: "Player 3", points: 30, illustration: "Illustration-6", skill: "Expert")

]

func incrementPoints(name: String) {

if let row = self.people.firstIndex(where: {$0.name == name}) {

people[row].points += 1

}

}

func decrementPoints(name: String) {

if let row = self.people.firstIndex(where: {$0.name == name}) {

people[row].points -= 1

}

}

}
The ViewModel is injected into the View with the help of the @StateObject property wrapper. Now we can access the functions we have inside our VM with viewModel.functionName() syntax.
struct PeopleView: View {

@StateObject var viewModel = PeopleViewModel()  // The VM is initialized

var body: some View {

ScrollView {

VStack(spacing: 20) {

ForEach(viewModel.people) { person in

CardHorizontal(viewModel: viewModel, person: person) // We pass the VM and the person

.frame(maxHeight: 220)

}

}

.padding()

.foregroundColor(.primary)

}

.navigationTitle("Players")

}

}
In order to pass the ViewModel down to subviews, we can use @ObservedObject property wrapper and initialise it in the parent view. Now we can use the - and + buttons to change the score of the player. I know it’s a silly example but it serves the purpose.
struct CardHorizontal: View {

@ObservedObject var viewModel: PeopleViewModel // Injected ViewModel so that the subview can listen to changes

//

var body: some View {

ZStack(alignment: .top) {

//

HStack {

VStack(alignment: .leading, spacing: 5) {

Spacer()

HStack {

Text(person.name)

.font(.title)

.fontWeight(.bold)

}

.foregroundColor(.primary)

HStack {

Text("Points: ")

Text("(person.points)")

Spacer()

Button(action: {

viewModel.decrementPoints(name: person.name) // Here we call the function from our VM

}) {

RoundIconButton(icon: "minus")

}

Button(action: {

viewModel.incrementPoints(name: person.name) // Here we call the function from our VM

}) {

RoundIconButton(icon: "plus")

}

}

.foregroundColor(.primary)

//

}

Spacer()

}

.padding()

.padding(.bottom)

}

//

}

}

You can find the full code here.
Summary
I tried to keep it as simple as possible so that it is clear what is the architecture about. To recap, a ViewModel can be as simple such as @State and @Binding. It is used to change the state of a view (i.e. update and redraw it) and implement the logic and data operations. Once the complexity of the app increases, it will become more obvious why MVVM makes sense. Hope you learned something new! If I did any mistakes in the code, please let me know.
